How to use a virtual background in vMix: Live Video Streaming Software

vMix is a live streaming and production program that lets you produce professional-looking content on your PC. You can add multiple cameras, NDI sources, videos, remote guests through vMix Call, photos, web feeds, audio, Powerpoint, virtual sets, titles, chroma key, and more to your show using vMix.You can then simultaneously record, perform, and live-stream your productions. Thus, if you have photographs or videos that you'd want to use, you can use a virtual background in vMix.
Rather watch a video? Check out our video tutorial here:
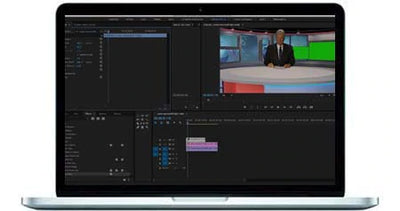
To do so, go to ‘Add Input’ and select the Camera option. To insert the backdrop image, click ‘Add Input’ and select the ‘Image’ tab. Click the cog symbol to open the Input Settings window beneath the Capture input. To chroma key background, click the eye dropper and choose it. After setting up the background, go to "Set Up" and select what goes into each layer of the combined video stream. The "Talent" layer is where your foreground video goes. The camera angles, zoom, and other options are then yours.
To explain this and make your understanding easier, this article will give a step-by-step procedure on how easy to use a virtual background in vMix.
Step 1 Open the Virtual Set
The first step is to open the virtual set, which comes in a Zip folder when you download it. After unzipping that folder, you'll notice the typical MP, Fours, and graphics files that come with the virtual set. After that, you'll see a vMix folder, and you'll want to load vMix and then click Add Input for the vMix folder. Navigate to your vMixix folder in the virtual set and choose it.
Step 2 Use the Blue Virtual Set
You can use the blue Hex virtual set, select folder, and then there's an XML file in the Mix folder explaining how to put everything together for that particular set. As a result, you'll see something similar when you first open the virtual scene. After that, you'll see your main presenter area, including various monitor options.
After that, you'll see your main presenter section, which includes a variety of monitor settings. Now, you must load up the footage you'll typically use. Perhaps a video input might be used. So, if you have a webcam or any other type of camera connected to your computer, you can use it as an input and place yourself behind a green screen in real-time.
Neither can you load the material that you'll be using regularly? You can drag in some green screen film and instruct it to loop by pressing Play. It will now play and loop indefinitely as long as you keep it there. You may also import Broll film to display on a monitor similarly.
Step 3 You can Use a Looping Video.
Double-click the loop name to bring up the input properties if you use a looping video as your background. You can make the clip loop in its properties. It will begin to play if you select loop and play it simultaneously.
After that, you can go to your virtual set settings and choose set up, and all of your layers will be laid out for you. So you have the virtual set as the background layer, followed by the various screen monitors, and then your talent layer. To choose a talent, you can change it.
Step 4 Incorporate the Chroma Key
The backdrop must now be Chroma keyed out, which is a simple task. Select the color key and the eyedropper tool, and sample your green in the monitor by clicking the gear icon.
There is also auto key presets, which are pretty helpful. The green screen will be removed if you press number two. The chroma binding effect can be fine-tuned by dragging various sliders.
Close the Capture input's input settings box, then click the cog symbol next to the Image input. So, select Capture input under the option box next to 1 on the MultiView tab. The chroma keyed camera is now visible above the image background.
Step 5 Choose the Monitor to Use
You can then choose which monitor to utilize in the scene. As a result, you can use any monitor in the display, pick different layers, and switch the monitor visibility off on other layers. So now, all you have to do is alter the input for screen one. This scales and puts your film on the screen for you automatically.
Step 6 Drag the Virtual Set
Next, drag one of the lower thirds into the scene. These also include every angle of the virtual set, which you can view if you click on it and then hit Play, where you'll see the YouTube lower third.
Then we'll just hit a layer if you want to put it on top of your presentation. You've got layer one and then layer two, similar to layers. You can also choose whether or not to loop this and do whatever you want.
Step 7 Play Video and Zoom it.
You can play it for a few seconds, then pause before clicking the gear symbol and moving it to the desired location. You can also change the zoom-in and out settings and whether or not you want the text to appear.
The social media lower thirds templates include premiere, After Effects, Photoshop, and a few additional formats. So, go into one of those tools or your video editing program, and add your handle to the lower third, then create a video that you can upload into save a mix.
Step 8 You may like to add B-Roll Video.
B-roll is used to help tell the scene. If you employ B-roll material irrelevant or contradictory to the story, you may find that it does more harm than good. When the A-roll and B-roll contradict each other, it can make videos more challenging to follow.
You can use your scene area finder/windows file explorer to add B-roll by dragging and dropping video or photos into it. B-roll adds visual appeal to your video by allowing you to include it. Keep viewers engaged by using a variety of shots.
Which video, video 1 or video 2, would you rather watch?
Single-shot video of someone explaining how to make tea.
Video 2: A narrated montage of shots explaining how tea is prepared.
Humans are visual animals; we like to be shown rather than told. B-roll gives you the freedom to be creative while conveying your tale, allowing you to use multiple shots and perspectives to complement the tone of your video.
So now we have our virtual set, the presenter, and the B roll footage in the way you have it set up. If you ever want to queue up this YouTube handle, press the play button, and it will appear on the screen for a few seconds before disappearing. Similarly, if you want to move the presenter, click the gear symbol and drag her around the scene.
Bottom Line
With a green or blue screen, vMix can do chroma keying. This platform has native support for multi-bitrate streaming, which is extremely valuable for professional broadcasters that want to transmit high-quality video.
vMix also supports the Network Device Interface (NDI), which sends your secure video upload over gigabit ethernet networks and green screens. A built-in titling tool with animation capability is also included with vMix. It also has a slow-motion and instant-replay feature.