Virtual Desks Volume 1 Detailed Tutorial

VIRTUAL NEWS DESKS VOLUME 1 TUTORIAL
Printer Friendly / PDF Version
OVERVIEW:
In this tutorial, I will walk you through how to use our virtual desks in a video editor during post production/editing. I will be using Adobe Premiere Pro for this tutorial, but the techniques used could be applied to nearly any video editor on the market.
PRODUCTS USED:
VIRTUAL DESKS VOL 1:
https://www.virtualsetlab.com/collections/virtual-desks/products/virtual-desks-vol-1
Additional Desks Available:
https://www.virtualsetlab.com/collections/virtual-desks
STEP 1:
After you purchase any desk volume from our site, you will be prompted to download the files from our site (you will also receive a download link in your email to get to your files).
Download the files to your local computer.
If you are on a mac, your files should automatically unzip from the zip file they are contained within. If you are on a Windows PC, you will need to right click on the files and manually unzip the files to your computer:

After unzipping the files you should see the following folders:

STEP 2:
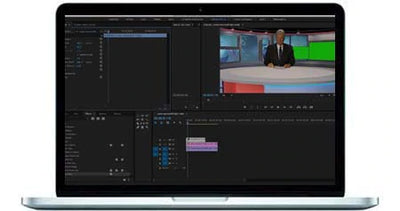
Open Adobe Premiere (or the video editor of your choice).
In the virtual desks folder you just uncompressed, open the folder for the desk you would like to use in the scene. For this example, I going to open Dig Table 4 folder.
Select all the PNG versions of the desk in this folder and import into Premiere Pro (or the video editor of your choice).

Create a new HD composition:

STEP 3:
After Creating your HD sequence, drag and drop the desk of your choice into the sequence

Scale down the size of the virtual desk in your scene as needed to fit the size of your shot.
Next, import the green screen footage you filmed of your presenter and drag and drop the shot into your scene on top of your desk.
****Helpful tip, notice in the footage below that we not only have a green screen behind the presenter, but also draped over a desk in front of the presenter. This allows us to more realistically marry the presenter with the virtual desk and we don’t have to attempt to crop out the legs of our presenter (or place him on the layer below/behind the desk). If you have an extra green screen and surface, try it on your next shoot!

Then, mask out areas of your scene not needed for the production:

Now, apply a green screen effect to remove the remaining green screen in the background. In Adobe Premiere Pro, I prefer Ultra Key.
Finally, scale and position your presenter on top of the desk:

And that’s it! You can fine tune your settings to really get a close match on your presenter and desk. The next couple of steps below are just for illustration purposes to show you what a final scene might look like:
Bonus Step 4: Add a virtual set
To finish the scene, add a virtual set on the layer below the presenter and desk layers:

Add a hue color effect to the desk element to adjust to match your background colors:

If your desk has place for TV/Motion Graphics, add a motion graphic and scale and position the motion graphic on the layer below the desk to fill in the TV area on the desk:

As you can see, there are a ton of creative possibilities in how to use our virtual desk graphics. If you have any questions, please get in touch at:
https://www.virtualsetlab.com/pages/contact-us
Thanks for your business and for your interest in our products!